import java.applet.*;
import java.awt.*;
import java.awt.event.*;
public class <classname> extends Applet implements <listeners> {

   <variable declarations>

   public void init() {

     <code to initialize the applet when the program begins executing>

   }

   <event handlers; methods that respond to events initiated by the user>

}
The variable declarations create various objects that can be
placed in the applet, as well as other values that represent the state
of the program. Variables may be integers, floats, booleans, Strings,
and arrays, just like in application programs. Variables may also
represent colors, buttons, menus, and text fields that have special interactive
roles inside the frame while the applet is running. Examples of these
will be shown below.
The listeners that appear in the heading of the applet identify the kinds of events to which the applet is prepared to respond. Usually three different kinds of events can be handled -- mouse motion events (the MouseMotionListener), mouse events (the MouseListener ), and other actions like button and text field selections (the ActionListener ) and selections from a menu of choices (the ItemListener).
The init method is executed first, when the applet begins executing. It has the responsibility of placing specific objects in the frame, such as buttons, choices, labels, and text fields. The init method also adds specific event listeners to the frame, one for each kind of event that can occur.
For each specific kind of event (like a button selection, mouse click, menu choice selection, or mouse drag) that can occur, the program must define a special method called an event handler. One handler is programmed to respond to the user pressing the mouse button, another may respond to the user dragging the mouse while the button is pressed, and still another may respond to the user selecting a button on the screen. Whenever such an event actually occurs, the appropriate handler is executed.
The program cannot know, or predict, the order in which these events will occur, or the number of times each one will be repeated; it has to be prepared for all possibilities. That's the essence of event-driven programming -- it's different from procedural programming in this fundamental way.
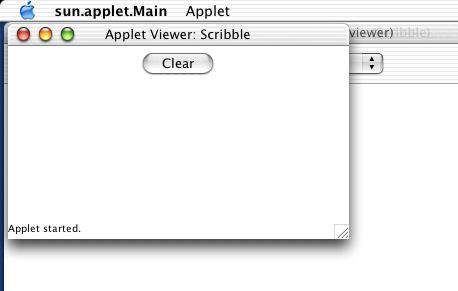
For example, here is the complete text of a Java applet, which is in the file Scribble.java. To run this program, drag a copy of the complete folder CS105 (Tucker) -> Scribble to the desktop, and double-click on the icon Scribble.pbproj..
// This example is adapted from the book _Java in a Nutshell_ by David
Flanagan.
import java.applet.*;
import java.awt.*;
import java.awt.event.*;
public class Scribble extends Applet implements MouseListener,
MouseMotionListener,
ActionListener {
int last_x = 0;
int last_y = 0;
Color current_color = Color.black;
Button clear_button = new Button("Clear");
// This function is called initially, when the program
begins
// executing. It initializes the applet and
adds components to it.
public void init() {
// Set the background color
this.setBackground(Color.white);
// Add a clear button and
a mouse listener to the applet
add(clear_button);
addMouseListener(this);
addMouseMotionListener(this);
clear_button.addActionListener(this);
}
// Called when the user presses the mouse button
to start a
// scribble. Sets the values of variables last_x
and last_y
// to mark the point of the click.
public void mousePressed(MouseEvent e) {
last_x = e.getX();
last_y = e.getY();
}
// These four are unused by this program, but must be included
// with MouseListener
public void mouseReleased(MouseEvent e) { }
public void mouseClicked(MouseEvent e) { }
public void mouseExited(MouseEvent e) { }
public void mouseEntered(MouseEvent e) { }
// Called when the user scribbles with the mouse
button down
// Draws a line between the points (last_x, last_y)
and (x, y)
public void mouseDragged(MouseEvent e)
{
int x = e.getX();
int y = e.getY();
Graphics g = this.getGraphics();
g.drawLine(last_x, last_y,
x, y);
last_x = x;
last_y = y;
}
// This one is unused, but must be included with
MouseMotionListener
public void mouseMoved(MouseEvent e) {}
// Called when the user clicks the Clear button,
and
// clears the graphics window.
public void actionPerformed(ActionEvent e) {
if (e.getSource() == clear_button)
{
Graphics
g = this.getGraphics();
Rectangle
r = this.bounds();
g.setColor(this.getBackground());
g.fillRect(r.x,
r.y, r.width, r.height);
}
}
}
Here, the variables declared are last_x, last_y, current_color, and clear_button. The init method initializes the applet on the screen, and the event handlers (the methods mousePressed, mouseDragged, and actionPerformed ) are prepared to respond to user-initiated events inside the applet.
<HTML>
<HEAD>
<TITLE>The Lab 8 Applet</TITLE>
</HEAD>
<APPLET archive="JavaClasses.jar" code="Scribble.class" width=300 height=200>
</APPLET>
</HTML>
HTML stands for "Hypertext Markup Language". It is a coding scheme for describing features of Web pages, like the one you're reading now. In HTML, one can define a frame that contains a running Java program, or a "class". In this case, the frame is identified with the Java program Scribble.class, and its size is defined to be 300x200 pixels in size when it appears on the screen.
For the purpose of graphics programming, an applet is viewed as a rectangular array of "pixels" (short for "picture elements"). Each distinct pixel is a dot on the screen has a distinct x-y coordinate value, and it can be set to a particular color. The pixels are so closely-packed on the screen that a series of adjacent pixels that have a certain color will appear to the naked eye as a continuous line.
For example, the applet below is running inside a 300x200-pixel graphics area, and each pixel has color white (which makes it effectively invisible). In addition to its drawing area, this applet has a "button" in the top center. We shall discuss buttons and other components that can be placed inside an applet in a later section.
The pixel in the upper lefthand corner of this area has x-y coordinates (0, 0) and the one in the lower righthand corner has coordinates (299, 199).
To activate the graphics environment inside an applet, the handler must retrieve it be declaring a Graphics object and initializing it, as shown below:
Graphics g = getGraphics();
Literally, this statement says to retrieve the graphics environment and assign it to the new local variable g. Now, any of the Graphics methods may be called to draw lines and shapes inside this applet. For instance, the following Graphics method
g.drawLine(0, 0, 299, 199);
draws a straight line diagonally through the applet from the upper lefthand
corner (the pixel at (0, 0)) to the lower righthand corner (the pixel at
(299, 199)). Here is a summary of the key Graphics methods that will
be useful to you:
| g.drawLine(x1,y1,x2,y2); | draws a line from location (x1, y1) to location (x2, y2) |
| g.drawRect(x1,y1,w,h); | |
| g.fillRect(x1,y1,w,h); | same as drawRect, but fills the rectangle with the current drawing color (see below). |
| g.drawOval(x1,y1,w,h); | |
| g.clearRect(x1,y1,w,h); | |
| g.fillRect(x1,y1,w,h); | |
| g.drawString(s,x1,y1); | |
| g.drawArc(x1,y1,w,h,start,arc); | |
| g.setColor(c); |
addMouseListener(this);
addMouseMotionListener(this);
Meover, all of the following handlers must be added to the program, and at least one must have some statements that respond to the event that it represents:
public void mousePressed(MouseEvent
e) { }
public void mouseReleased(MouseEvent
e) { }
public void mouseClicked(MouseEvent
e) { }
public void mouseExited(MouseEvent
e) { }
public void mouseEntered(MouseEvent
e) { }
public void mouseDragged(MouseEvent
e) { }
public void mouseMoved(MouseEvent
e) {}
For instance, the typical response to a mouse event is to capture the x-y pixel coordinates where that event occurred on the frame. To do this, use the getX and getY methods of the MouseEvent class. For example, the following handler responds to a mouse click by storing the x-y coordinates of the click in the variables x and y.
public void mouseClicked(MouseEvent
e) {
int x = e.getX();
int y = e.getY();
}
General form                                  Example
-------------------------------------------   ------------------------------------------
Button <variable> = new Button(<string>);    Button clear_button = new Button("Clear");
General form
Example
-------------------------------------------
----------------------------------
add(<variable> );
add(clear_button);
<variable>.addActionListener(this);
clear_button.addActionListener(this);
    public void actionPerformed (ActionEvent e) {
       if (e.getSource() == <variable>) {
          <statements>
       }
    }
Here, the <variable>refers to the name of the Button
variable as declared and initialized, and <statements>
define what to do whenever that event occurs. Below, for example, is
a handler that clears the screen whenever the clear_buttonis clicked
by the user:
public
void actionPerformed(ActionEvent e) {
if (e.getSource() == clear_button) {
Graphics g = this.getGraphics();
Rectangle r = this.bounds();
g.setColor(this.getBackground());
g.fillRect(r.x, r.y, r.width, r.height);
}
}
A TextArea is an object on the screen which is named and can display text messages to the user. It is a scrollable object, so users have a complete record of the text output. A TextField is an object into which the user can type a single line of text from the keyboard; it raises an ActionEvent when the user types the return key at the end of the line. TextAreas and TextFields are declared as follows:
TextArea and TextField
objects are placed in the applet as part of the init method in
your program. Initialization requires the number of lines of text (for TextAreas)
and the number of characters per line to be specified.
<variable2>
= new TextField(<chars>); user_typing = new TextField(40);
add(<variable2>
);
add(user_typing);
<variable2>
.addActionListener(this); user_typing.addActionListener(this);
In these examples,
we have declared and placed a 5 x 40 TextArea and a 40-character writeable
TextField in the current frame.
When the user types
in the TextField and hits the return key, your program can handle that
event by writing additional code in the actionPerformed event
handler:
For example, the user's typing can be immediately echoed in the TextArea by concatenating it with all the text that's already there. The getText and setText methods are useful for this purpose, as shown below:
echo_area.setText(echo_area.getText() + s + "\n");If this line is added as the <action>in the above code, the user's typing will be echoed on a new line inside the TextArea object named echo_area.
The choice is named and placed in the frame as part of the init
method in your program. The different selections are assigned to the
Choice variable using the addItem function , and interaction is
triggered by adding a listener to the frame for the choice.
When the user selects one of the choices, your program handles that event
by using an itemStateChanged method:
Whenever the frame is resized, the objects are replaced to fit the new size. This can happen any time while the applet is running. However, the original order of objects is not rearranged when the frame is resized.
You may exercise more control over the placement of objects in the frame
by selecting a different so-called "layout manager." There are three
kinds of layout managers available, FlowLayout (that's the default
we've been using above), GridLayout (where you divide the frame
into a rectangular array of locations lacing objects), and BorderLayout
(where you place objects either on the north, east, south, west, or
center of the frame). A layout manager is selected at the beginning
of the
init
method in an applet, as follows:
In the second example, the parameters define a 3x5 array of locations
into which objects are placed inside the frame. Tis guarantees that
objects will appear in specific columns regardless of how the frame is resized
at run time.
When the BorderLayout manager is used, all objects must be added to the
frame by specifying their location ("North", "South", "East", "West", or
"Center"). For instance,
places "The Title" in the top center of the frame.